Sampling earthworms
Finding earthworms is easy! Even a simple back garden can yield a diverse range of species. Different species of earthworms inhabit different microhabitats so there are a number of sampling techniques available for collecting earthworms. The National Earthworm Recording Scheme (NERS) standard protocol outlined below is great for collecting high quality data that can be compared and analysed across sites. However, non-standardised recording methods still provide valuable species data and we welcome any and all records of earthworm species. It's worth remembering that even common species of earthworm have never been recorded in some counties so even a casual record of a common species may be a very important record! Earthworm recording can be simply turning over logs or looking under pots in your back garden.
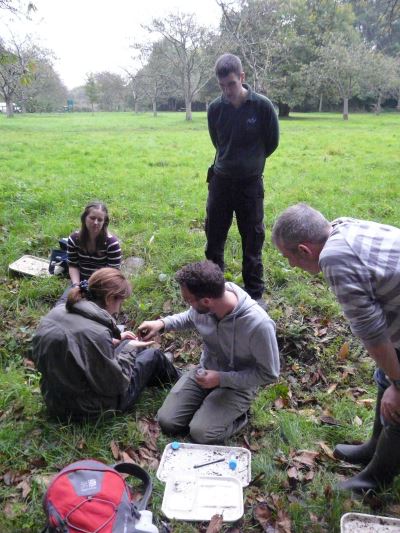
Sampling Standard Protocol
Our sampling standard protocol has been designed in a standardised manner so that the data collected is comparable across sites. It consists of soil pit sampling and microhabitat searches as outlined below. A downloadable version of this guidance is included in the ESB Earthworm Recorder Pack.
Soil Pit Sampling

Step 1 - Planning
A map of your sample site is useful to mark where you will take your samples, or for identifying different habitats in which to take samples. Look for areas that have no current records. New records on sites that have been previously sampled are still useful as you may get different results. Remember that if you do not own the land where you are sampling you will need permission from the landowner first.
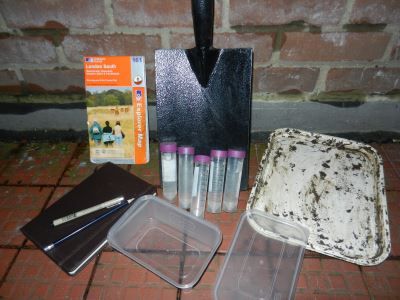
Step 2 - Equipment
You will need the following:
- A spade (to dig the pits)
- 5 plastic tubes of 80% ethanol (to store and preserve earthworms)
- A sorting tray (to place the soil on in order to sort through and look for earthworms, alternatives include pots or bin bags)
- Labels and alcohol resistant pen/pencil (to label your samples and ensure they don't get mixed up)
- Notebook and map (to make note of the location, habitat and other important factors)
- Pointed non-serrated forceps (optional but useful)
- Gloves (to keep your hands clean)
Identification is made easier if you undertake the optional sixth step of relaxing
your earthworms as they will be better preserved:
- A plastic take away container with lid (to relax and align your earthworms)
- A bottle of 30% ethanol (to relax your earthworms)
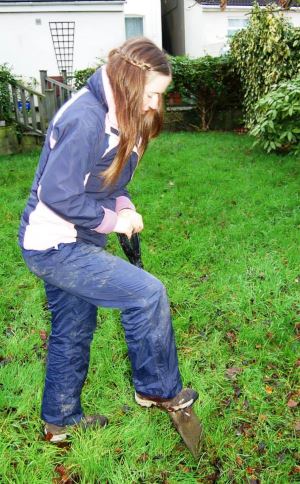

Step 3 - Digging
A spade can now be used to dig a soil pit. The standard pit size for the National Earthworm Recording Scheme is 25cm by 25cm, to a depth of 10cm.
Step 4 - Sorting
The soil from the pit should be placed on the sorting tray/bin bag/pot and sort through it with your hands.
Step 5 - Earthworms
Any earthworms that are found in the soil should be removed and collected into a container.

Step 6 - Relaxing (optional)
In order to stop the earthworms being preserved in awkward positions, the earthworms can be relaxed and straightened. This will make identification of the specimens much easier.
- Place the earthworms in a container of 30% ethanol.
- Leave for about 5 minutes to relax the earthworms.
- Straighten out the earthworms in the grooves of the lid.
- Pour 80% ethanol onto the earthworms.
- Leave for 5-10 minutes before placing the earthworms in the plastic tube containing a label and 80% ethanol.
Any earthworms that are found in the soil should be removed and collected into a container.

Step 7 - Preservation and Labeling
All the earthworms that have been collected from the pit should be placed in a tube of 80% ethanol. The size/number of tubes used will depend on how many earthworms were collected. Sometimes a pit can yield over 100 earthworms! The 80% ethanol will act as a killing agent and preserve the earthworms. However, earthworms contain a lot of fluid and will release this fluid when they are placed in the ethanol. This will dilute the ethanol and cause the earthworms to deteriorate, so the alcohol should be changed following sampling to prevent this. A label should also be placed in the tube to identify the pit and site that the sample belongs to.
Step 8 - Replication
The standard number of pits is 5 per site for the National Earthworm Recording Scheme. This is important to get a standardised sample of the site. Pits need only be a couple of metres apart (see guidance for planning your soil pits below).
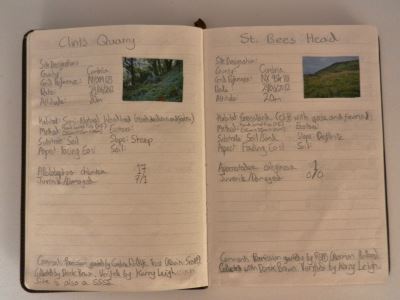
Step 9 - Recording
(See our guidance for Creating and Submitting Earthworm Records for further details.)
- Site details should be recorded on site where possible:
- Who (the recorder and any helpers)
- Where (using GPS to gain latitude/longitude or a grid reference obtained from an OS map/online tool, as well as the site name and county)
- When (record the date)
- Sampling method (either enter ESB soil pit sampling standard protocol or give the pit size and number of pits if different)
- Habitat (the general habitat is useful, but also other details such plant species present and any other habitat comments that may be relevant)
- Substrate (for soil pits this will always be soil/sand)
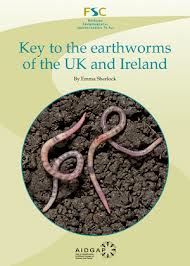
Step 10 - Identification
All you need to do now is identify your earthworms under the microscope. The Key to the Earthworms of the UK & Ireland by Sherlock (second edition) is available from the FSC website. For beginners at earthworm ID we run earthworm ID courses which are advertised on our website and facebook page. Earthworm ID is straightforward in most cases, but when you are starting of it's a good idea to get an experienced eartworm surveyor to check your ID's so you know you are correct and to improve your skills. If you have identified some earthworms and want to check them please email us to let us know before you send them.
Planning your soil pits
When planning your 5 soil pits it is important that all of your five soil pits fall within the habitat you are sampling. Please note that the distances provided in the following examples do not need to be exact and are given to provide approximate guidance so that it is clear that soil pits should not be spaced a great distance apart.

Large patches of habitat
If you are sampling a habitat that covers a big enough area, soil pits can be arranged in a square formation, with one pit in each corner (for example between 5 and 10 metres apart) and one in the centre. Examples of this type of habitat may include open fields, gardens, woodland and parks.

Linear Habitats
Some habitats are linear and, in these cases a linear transect should be used with pits spaced evenly apart (for example between 2 and 5 metres). Linear transects may not necessarily be in a straight line and may be curved. Examples of this type of habitat may include hedgerows, riverbanks, pond edges and tree lines.
Other Habitats
In some cases neither of these arrangements will be suitable and the arrangement will need to be adapted to suit the habitat you are sampling. If the habitat is patchy, soil pits should be planned in patches of the same habitat.

Microhabitat Searches
Soil pit sampling allows a standardised quantitative method of sampling a site for earthworms. However, earthworm inhabit substrates other than soil so it is good practice to search any microhabitats present at each site to improve the likelihood of recording species that are less likely to be encountered in soil pits. It is advisable to only take adult earthworms (not juveniles) as this method of surveying is not quantitative.
There is no exhaustive list of habitats and microhabitats that may be present, but some examples are provided below:
Deadwood - search under deadwood (both the surface of the deadwood and the substrate it is resting on) by turning it over. Also check for earthworms under the bark and within the deadwood. When sampling deadwood destructively please ensure a minimal amount of deadwood is destroyed to maintain the microhabitat in within the ecosystem.
Dung - dung contains rich organic matter and earthworms may be found within/beneath the dung or in the top layer of soil beneath the dung.
Turnover - turning over items can often yield earthworms. Example objects to turnover would include any item resting on soil and items such as plant pots, wooden boards and bin bags on any substrate.
Leaf Litter - leaf litter can be searched by hand or sieved. Some earthworms may be found within the very top layer of the soil, whereas others may be found on the surface beneath the litter.
Hedgerows - some earthworms are thought to be associated with hedgerows and may be found in the top layer of soil beneath hedgerows.
Compost - compost heaps/bins are often home to dense populations of earthworms. They can usually be found by simply searching the top layer of the compost.
Please record the earthworms you find in microhabitats separately from those you find within the soil pits (even if a species occurs in both). Recording the presence of a species in multiple habitats or microhabitats helps us learn more about the ecology of different earthworm species and their associations with specific conditions.
Mustard Sampling
On some sites it may not be possible to get permission to dig. An alternative method of getting earthworms out of the ground is to pour a mustard solution on the ground. To make the mustard solution, add 25 ml volume of mustard powder to 0.75 litre of tap water and shake well. Keep checking the area where you poured the solution (and surrounding area) for ten minutes to see if any earthworms emerge. Any adult earthworms that appear can be taken and preserved for identification.
Health & Safety
You should carry out your own risk assessment before doing fieldwork. We recommend the following precautions:
- Avoid doing fieldwork on your own, if you do ensure you tell someone exactly where you will be and when you expect to return.
- Always ask permission from the owner before entering land.
- Always tell a responsible adult where you are going and what time you expect to return.
- Check the weather forecast before doing fieldwork, and take appropriate clothing.
- Be aware of local hazards such as dangerous wildlife or hazardous terrain.
- Watch out for dangers such as sharp objects and broken glass in soil
- Take care to avoid hurting yourself and soil borne diseases by wearing gloves.
- Always take a mobile phone and a map of the area.
- Know who to contact in the event of an emergency and check where the nearest source of help is in case your mobile phone does not work.

Except where otherwise indicated, this work was created by Keiron Derek Brown on behalf of the Earthworm Society of Britain and is licensed under a Creative Commons Attribution 4.0 International License.
 Join us now!